Dataset + File Management
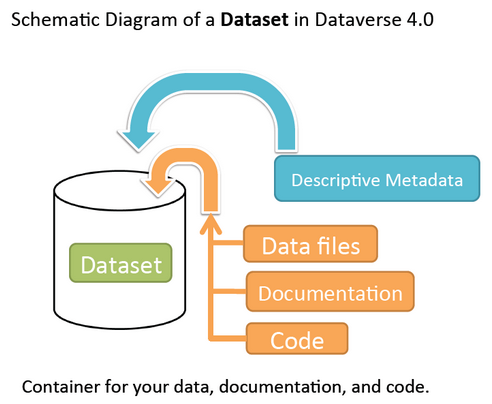
A dataset in Dataverse is a container for your data, documentation, code, and the metadata describing this Dataset.
Supported Metadata
A dataset contains three levels of metadata:
- Citation Metadata: any metadata that would be needed for generating a data citation and other general metadata that could be applied to any dataset;
- Domain specific Metadata: with specific support currently for Social Science, Life Science, Geospatial, and Astronomy datasets; and
- File-level Metadata: varies depending on the type of data file - see File Handling and Uploading section below for more details).
For more details about what Citation and Domain specific metadata is supported please see our Appendix.
Note that once a dataset has been published its metadata may be exported. A button on the dataset page’s metadata tab will allow a user to export the metadata of the most recently published version of the dataset. Currently supported export formats are DDI, Dublin Core and JSON.
Adding a New Dataset
- Navigate to the dataverse in which you want to add a dataset.
- Click on the “Add Data” button and select “New Dataset” in the dropdown menu.
- To quickly get started, enter at minimum all the required fields with an asterisk to get a Data Citation with a DOI (e.g., the Dataset Title, Author, Description, Contact Email and Subject).
- Scroll down to the “Files” section and click on “Select Files to Add” to add all the relevant files to your Dataset. You can also upload your files directly from your Dropbox. Tip: You can drag and drop or select multiple files at a time from your desktop, directly into the upload widget. Your files will appear below the “Select Files to Add” button where you can add a description and tags (via the “Edit Tag” button) for each file. Additionally, an MD5 checksum will be added for each file. If you upload a tabular file a Universal Numerical Fingerprint (UNF) will be added to this file.
- Click the “Save Dataset” button when you are done. Your unpublished dataset is now created.
Note 1: You can add additional metadata once you have completed the initial dataset creation by going to Edit Dataset > Metadata.
Supported HTML Fields
We currently only support the following HTML tags for any of our textbox meatdata fields (i.e., Description) : <a>, <b>, <blockquote>, <br>, <code>, <del>, <dd>, <dl>, <dt>, <em>, <hr>, <h1>-<h3>, <i>, <img>, <kbd>, <li>, <ol>, <p>, <pre>, <s>, <sup>, <sub>, <strong>, <strike>, <ul>.
File Handling + Uploading
To upload new files to a dataset, click the “Edit” button at the top of the dataset page and from the dropdown list select “Files (Upload)” or click the “Upload Files” button above the files table in the Files tab. From either option you will be brought to the Upload Files page for that dataset.
Once you have uploaded files, you will be able to edit the file metadata, restrict, add tags. Click “Save Changes” to complete the upload. If you uploaded a file by mistake, you can delete them before saving by clicking the checkbox to select the file, and then clicking the “Delete” button above the files table.
File upload limit size varies based on Dataverse installation. The file upload size limit can be found in the text above where files are uploaded in the application. If you have further questions, contact support for that installation by clicking on the Support link at the top of the application.
The file types listed below are supported by additional functionality, which can include downloading in different formats, subsets, file-level metadata preservation, file-level data citation; and exploration through data visualization and analysis.
Tabular Data Files
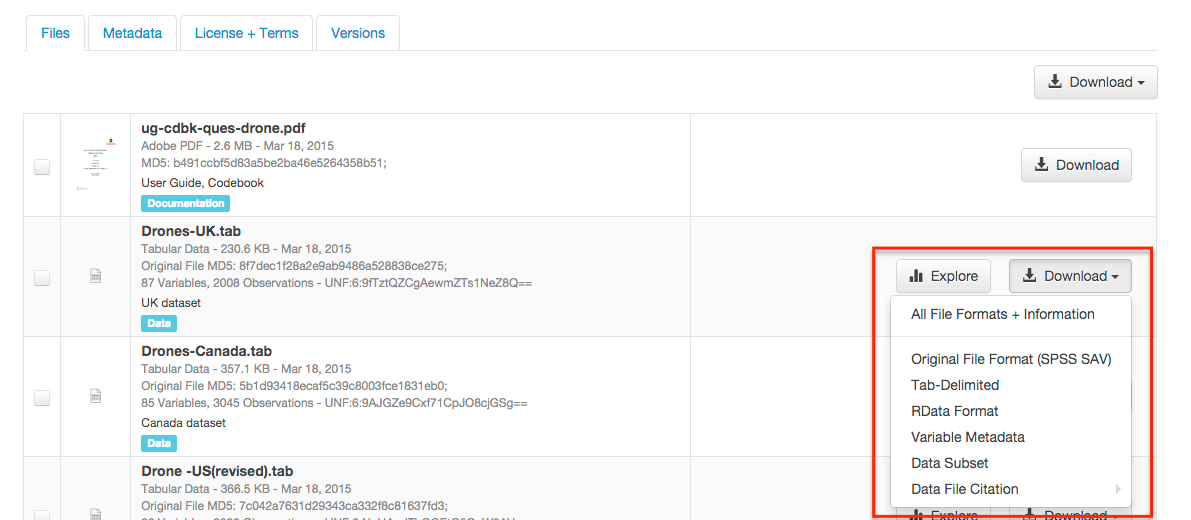
Files in certain formats - Stata, SPSS, R, Excel(xlsx) and CSV - may be ingested as tabular data (see “Tabular Data Ingest” section for details). Tabular data files can be further explored and manipulated with TwoRavens - a statistical data exploration application integrated with Dataverse. It allows the user to run statistical models, view summary statistics, download subsets of variable vectors and more. To start, click on the “Explore” button, found next to each relevant tabular file (the application will be opened in a new window). To download subsets of variables click on the “Download” button found next to a relevant tabular file and select “Data Subset” in the dropdown menu. You will then be able to create your subset using the interface opened in a new window (this functionality is also provided by the TwoRavens project). See the TwoRavens documentation section for more information.
For example, the ingest functionality for tabular files in the Harvard Dataverse, a file can only be up to 2GB in size. To use the ingest functionality for RData files, a file can only be up to 1MB in size, however, to upload a RData file without using ingest, a file can be up to 2GB in size.
Additional download options available for tabular data (found in the same drop-down menu under the “Download” button):
- As tab-delimited data (with the variable names in the first row);
- The original file uploaded by the user;
- Saved as R data (if the original file was not in R format);
- Variable Metadata (as a DDI Codebook XML file);
- Data File Citation (currently in either RIS or EndNote XML format);
- All of the above, as a zipped bundle.
Geospatial
Geospatial shapefiles can be further explored and manipulated through our integration with WorldMap, a geospatial data visualization and analysis tool developed by the Center for Geographic Analysis at Harvard University. A shapefile is a set of files, often uploaded/transferred in .zip format. This set may contain up to 15 files. A minimum of 3 specific files (.shp, .shx, .dbf) are needed to be a valid shapefile and a 4th file (.prj) is required for WorldMap–or any type of meaningful visualization.
For ingest into Dataverse and connecting to WorldMap, these 4 files are the minimum required:
- .shp - shape format; the feature geometry itself
- .shx - shape index format; a positional index of the feature geometry to allow seeking forwards and backwards quickly
- .dbf - attribute format; columnar attributes for each shape, in dBase IV format
- .prj - projection format; the coordinate system and projection information, a plain text file describing the projection using well-known text format
For a zipped shapefile, we require 4 files with these extensions. Other files may be included within the zipped shapefile, but they are not required:
- .shp
- .shx
- .prj
- .dbf
For example, if these files were included within a .zip, the “Map Data” button would appear:
- subway_line.shp
- subway_line.shx
- subway_line.prj
- subway_line.dbf
Once you publish your dataset with your shape files, you will be able to use the “Map Data” button using GeoConnect to visualize and manipulate these files for users to Explore this geospatial data using the WorldMap interface. Please note: In order to map your data file, a copy will be sent to Harvard’s WorldMap platform. You have the ability to delete any maps, and associated data, from the Harvard WorldMap platform, at any time.
Astronomy (FITS)
Metadata found in the header section of Flexible Image Transport System (FITS) files are automatically extracted by Dataverse, aggregated and displayed in the Astronomy Domain-Specific Metadata of the Dataset that the file belongs to. This FITS file metadata, is therefore searchable and browsable (facets) at the Dataset-level.
Compressed Files
Compressed files in zip format are unpacked automatically. If it fails to unpack, for whatever reason, it will upload as is. If the number of files inside are more than a set limit (1,000), you will get an error message and the file will uploads as is.
Support for unpacking tar files will be added when this ticket is closed: https://github.com/IQSS/dataverse/issues/2195.
Advanced Options
There are several advanced options available for certain file types.
- Image files: jpgs, pngs, and tiff files are able to be selected as the default thumbnail for a dataset. The selected thumbnail will appear on the search result card for that dataset.
- SPSS files: SPSS files can be tagged with the language they were originally coded in. This is found by clicking on Advanced Options and selecting the language from the list provided.
Edit Files
Edit File Metadata
Go to the dataset you would like to edit where you will see the listing of files. Select the files you would like to edit by using either the Select All checkbox or individually selecting files. Next, click the “Edit Files” button above the file table and from the dropdown menu select if you would like to:
- Delete the selected files
- Edit the file metadata (file name, description) for the selected files
- Restrict the selected files
- Unrestrict the selected files (only if the selected files are restricted)
- Add tags to the selected files
You will not have to leave the dataset page to complete these action, except for editing file metadata, which will bring you to the Edit Files page. There you will have to click the “Save Changes” button to apply your edits and return to the dataset page.
If you restrict files, you will also prompted with a popup asking you to fill out the Terms of Access for the files. If Terms of Access already exist, you will be asked to confirm them.
File Tags
File tags are comprised of custom, category (i.e. Documentation, Data, Code) and tabular data tags (i.e. Event, Genomics, Geospatial, Network, Panel, Survey, Time Series). Use the dropdown select menus as well as the custom file tag input to apply these tags to the selected files. There is also a Delete Tags feature that, if checked, will allow you to delete unused file tags within that dataset.
Replace Files
In cases where you would like to revise an existing file rather than add a new one, you can do so using our Replace File feature. This will allow you to track the history of this file across versions of your dataset, both before and after replacing it. This could be useful for updating your data or fixing mistakes in your data.
Go to the file page for the file you would like to replace, click on the “Edit” button, and from the dropdown list select “Replace”. This will bring you to the Replace File page, where you can see the metadata for the most recently published version of the file and you can upload your replacement file. Once you have uploaded the replacement file, you can edit its name, description, and tags. When you’re finished, click the “Save Changes” button.
After successfully replacing a file, a new dataset draft version will be created. A summary of your actions will be recorded in the dataset Version Details table in the “Versions” tab on that dataset’s page, and in the file Version Details table on the file’s page. Both tables allow you to access all previous versions of the file across all previous versions of your dataset, including the old version of the file before you replaced it.
Terms
In the Terms tab, which can also be found by clicking on the Edit dropdown button of a Dataset, you can setup how users can use your data once they have downloaded it (CC0 waiver or custom Terms of Use), how they can access your data if you have files that are restricted (terms of access), and enable a Guestbook for your dataset so that you can track who is using your data and for what purposes. These are explained in further detail below:
CC0 Waiver + Dataset Terms of Use
Starting with Dataverse version 4.0, all new datasets will default to a CC0 public domain dedication . CC0 facilitates reuse and extensibility of research data. Our Community Norms as well as good scientific practices expect that proper credit is given via citation. If you are unable to give your datasets a CC0 waiver you may enter your own custom Terms of Use for your Datasets.
* Legal Disclaimer: these Community Norms are not a substitute for the CC0 waiver or custom terms and licenses applicable to each dataset. Please be advised that the Community Norms are not a binding contractual agreement, and that downloading datasets from Dataverse does not create a legal obligation to follow these policies.
Custom Terms of Use for Datasets
If you are unable to use a CC0 waiver for your datasets you are able to set your own custom terms of use. To do so, select “No, do not apply CC0 - “Public Domain Dedication” and a Terms of Use textbox will show up allowing you to enter your own custom terms of use for your dataset. To add more information about the Terms of Use, click on “Additional Information [+]”.
Here is an example of a Data Usage Agreement for datasets that have de-identified human subject data.
Restricted Files + Terms of Access
If you restrict any files in your dataset, you will be prompted by a pop-up to enter Terms of Access for the data. This can also be edited in the Terms tab or selecting Terms in the “Edit” dropdown button in the dataset. You may also allow users to request access for your restricted files by enabling “Request Access”. To add more information about the Terms of Access, click on “Additional Information [+]”.
Guestbook
This is where you will enable a particular Guestbook for your dataset, which is setup at the Dataverse-level. For specific instructions please visit the Dataset Guestbooks section of the Dataverse Management page.
Permissions
Dataset-Level
Dataset permissions can be found from the dataset by clicking the “Edit” button and from the dropdown list selecting “Permissions”.
The dataset permissions page has two sections: Users/Groups and Roles. In the top, “Users/Groups” panel, you can find all the users and groups that have access to your dataset. To give someone access to view your unpublished dataset or edit your published or unpublished dataset, click on the “Assign Roles to Users/Groups” button in the Users/Groups section.
The panel below that is “Roles” where you can find all the roles set up in your dataverse, that you can assign to users and groups. These roles are set at your dataverse-level and are displayed here at the dataset-level as a reference for when you are granting permission to users and/or groups.
File-Level
If you have restricted specific files the file-level permissions is where you will need to go to grant users/groups access to specific restricted files. Dataset file permissions are located under Permissions in the Edit button on a dataset page. The file permissions page has two sections: Users/Groups and Files.
To give someone access to your restricted files, click on the “Grant Access to Users/Groups” button in the Users/Groups section.
Publish Dataset
When you publish a dataset (available to an Admin, Curator, or any custom role which has this level of permission assigned), you make it available to the public so that other users can browse or search for it. Once your dataset is ready to go public, go to your dataset page and click on the “Publish” button on the right hand side of the page. A pop-up will appear to confirm that you are ready to actually Publish since once a dataset is made public it can no longer be unpublished.
Whenever you edit your dataset, you are able to publish a new version of the dataset. The publish dataset button will reappear whenever you edit the metadata of the dataset or add a file.
Note: Prior to publishing your dataset the Data Citation will indicate that this is a draft but the “DRAFT VERSION” text will be removed as soon as you Publish.
Submit for Review
If you have a Contributor role (can edit metadata, upload files, and edit files, edit Terms, Guestbook, and Submit datasets for review) in a Dataverse you can submit your dataset for review when you have finished uploading your files and filling in all of the relevant metadata fields. To Submit for Review, go to your dataset and click on the “Submit for Review” button, which is located next to the “Edit” button on the upper-right. Once Submitted for Review: the Admin or Curator for this Dataverse will be notified to review this dataset before they decide to either “Publish” the dataset or “Return to Author”. If the dataset is published the contributor will be notified that it is now published. If the dataset is returned to the author, the contributor of this dataset will be notified that they need to make modifications before it can be submitted for review again.
Private URL to Review Unpublished Dataset
Creating a Private URL for your dataset allows you to share your dataset (for viewing and downloading of files) before it is published to a wide group of individuals who may not have a user account on Dataverse. Anyone you send the Private URL to will not have to log into Dataverse to view the dataset.
- Go to your unpublished dataset
- Select the “Edit” button
- Select “Private URL” in the dropdown menu
- In the pop-up select “Create Private URL”
- Copy the Private URL which has been created for this dataset and it can now be shared with anyone you wish to have access to view or download files in your unpublished dataset.
To disable a Private URL and to revoke access, follow the same steps as above until step #3 when you return to the popup, click the “Disable Private URL” button.
Dataset Versions
Versioning is important for long-term research data management where metadata and/or files are updated over time. It is used to track any metadata or file changes (e.g., by uploading a new file, changing file metadata, adding or editing metadata) once you have published your dataset.
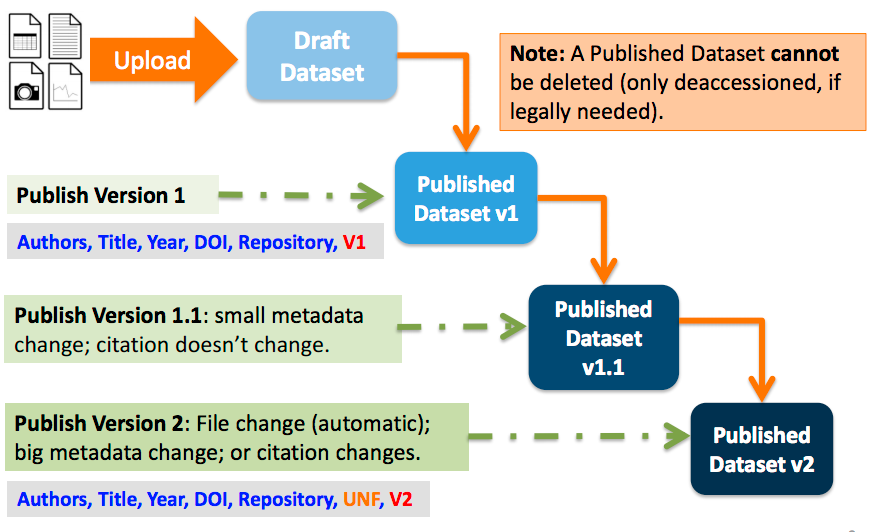
Once you edit your published dataset a new draft version of this dataset will be created. To publish this new version of your dataset, select the “Publish Dataset” button on the top right side of the page. If you were at version 1 of your dataset, depending on the types of changes you had made, you would be asked to publish your draft as either version 1.1 or version 2.0.
Important Note: If you add a file, your dataset will automatically be bumped up to a major version (e.g., if you were at 1.0 you will go to 2.0).
On the Versions tab of a dataset page, there is a versions table that displays the version history of the dataset. You can use the version number links in this table to navigate between the different versions of the dataset, including the unpublished draft version, if you have permission to access it.
There is also a Versions tab on the file page. The versions table for a file displays the same information as the dataset, but the summaries are filtered down to only show the actions related to that file. If a new dataset version were created without any changes to an individual file, that file’s version summary for that dataset version would read “No changes associated with this version”.
Version Details
To view what has exactly changed starting from the originally published version to any subsequent published versions: click the Versions tab on the dataset page to see all versions and changes made for that particular dataset.
Once you have more than one version (can be version 1 and a draft), you can click the “View Details” link next to each summary to learn more about the metadata fields and files that were either added or edited. You can also click the checkboxes to select any two dataset versions, then click the “View Differences” button to open the Version Differences Details popup and compare the differences between them.
Deaccession Dataset
Warning
It is not recommended that you deaccession a dataset or a version of a dataset. This is a very serious action that should only occur if there is a legal or valid reason for the dataset to no longer be accessible to the public. If you absolutely must deaccession, you can deaccession a version of a dataset or an entire dataset.
To deaccession, go to your published dataset (or add a new one and publish it), click the “Edit” button, and from the dropdown menu select “Deaccession Dataset”. If you have multiple versions of a dataset, you can select here which versions you want to deaccession or choose to deaccession the entire dataset.
You must also include a reason as to why this dataset was deaccessioned. Select the most appropriate reason from the dropdown list of options. If you select “Other”, you must also provide additional information.
Add more information as to why this was deaccessioned in the free-text box. If the dataset has moved to a different repository or site you are encouraged to include a URL (preferably persistent) for users to continue to be able to access this dataset in the future.
If you deaccession the most recently published version of the dataset but not all versions of the dataset, you are able to go in and create a new draft for the dataset. For example, you have a version 1 and version 2 of a dataset, both published, and deaccession version 2. You are then able to edit version 1 of the dataset and a new draft vresion will be created.
Important Note: A tombstone landing page with the basic citation metadata will always be accessible to the public if they use the persistent URL (Handle or DOI) provided in the citation for that dataset. Users will not be able to see any of the files or additional metadata that were previously available prior to deaccession.
Widgets
The Widgets feature provides you with code for your personal website so your dataset can be displayed. There are two types of Widgets for a dataset: the Dataset Widget and the Dataset Citation Widget. The Widgets are found by going to your dataset page, clicking the Edit button (the one with the pencil icon) and selecting Widgets from the dropdown menu.
On the Widgets page, you can copy and paste the code snippets for the widget you would like to add to your website. If you need to adjust the height of the widget on your website, you may do so by editing the heightPx=500 parameter in the code snippet.
Dataset Widget
The Dataset Widget allows the citation, metadata, files and terms of your dataset to be displayed on your website. When someone downloads a data file in the widget, it will download directly from the datasets on your website. If a file is restricted, they will be directed to your dataverse to log in, instead of logging in through the widget on your site.
To edit your dataset, you will need to return to the Dataverse repository where the dataset is stored. You can easily do this by clicking on the link that says “Data Stored in (Name) Dataverse” found in the bottom of the widget.
Dataset Citation Widget
The Dataset Citation Widget will provide a citation for your dataset on your personal or project website. Users can download the citation in various formats by using the Cite Data button. The persistent URL in the citation will direct users to the dataset in your dataverse.
Adding Widgets to an OpenScholar Website
- Log in to your OpenScholar website
- Either build a new page or navigate to the page you would like to use to show the Dataverse widgets.
- Click on the Settings Cog and select Layout
- At the top right, select Add New Widget and under Misc. you will see the Dataverse Dataset and the Dataverse Dataset Citation Widgets. Click on the widget you would like to add, fill out the form, and then drag it to where you would like it to display in the page.