TwoRavens
TwoRavens is a web application for tabular data exploration and statistical analysis. It can be integrated with Dataverse, as an optional component. While TwoRavens was originally created at IQSS, its developers have since left the organization. Plans for the future of the Dataverse/TwoRavens collaboration are still being worked out. As such, support for TwoRavens is somewhat limited at the moment (as of Spring of 2017).
Any questions regarding the features of TwoRavens, bug reports and such, should be addressed directly to the developers of the application. The TwoRavens GitHub repository and the TwoRavens project page are good places to start.
For now, the Dataverse project will continue providing installation and integration support. We have created a new (as of Dataverse v.4.6.1) version of the installer scripts and updated this guide. We have tried to improve and simplify the installation process, particularly the difficult process of installing correct versions of the required third party R packages.
Note that the installation process below supercedes the basic R setup described in the “Prerequisites” portion of the Installation Guide. Meaning that once completed, it installs everything needed to run TwoRavens, PLUS all the libraries and components required to ingest RData files, export as RData, and use Data Explorer.
Please be warned:
- This process may still require some system administration skills.
- The guide below is very Linux-specific. This process has been tested on RedHat/CentOS servers only. In some ways it may actually be easier to get it all installed on MacOS X (because MacOS X versions of third party R packages are available pre-compiled), or even on Windows. But it hasn’t been attempted, and is not supported by the Dataverse team.
In addition to the TwoRavens web application proper, several required components need to be installed and configured. This includes R, rApache and a collection of required third-party R packages. The installation steps for these components are described in the individual sections of the document below.
Contents:
0. Overview
TwoRavens is itself a compact JavaScript application that runs on the user’s browser. These JavaScript files, and the accompanying HTML, CSS, etc. files are served by an HTTP server (Apache) as static objects.
The statistical calculations are performed by R programs that run on the server. rApache is used as the web front end for R on the server, so that the browser application can talk to R over HTTP.
See the “Advanced Installation” section of the Preparation section for an example of running various components on more than one server.
TwoRavens will need to obtain some tabular-data-specific metadata from
Dataverse – the DDI fragment that describes the variables and some pre-processed
summary statistics for the data vectors. In order to produce the latter, the Dataverse
application also needs to be able to execute some R code on the server. Instead of
rApache, Dataverse uses Rserve to
communicate to R. Rserve is installed as a “contributor” R package. It runs as a
daemon process on the server, accepting network connections on a dedicated port.
Dataverse project supplies an init.d-style startup file for the
daemon. The R setup in step 2. will set it up so that the daemon gets started
automatically when the system boots.
When a user requests to run
a statistical model on a data file, TwoRavens will instruct the R code on the
server to download the file directly from the Dataverse application. Access
URLs need to be configured for this to work properly (this is done by the TwoRavens
installer script in step 3.)
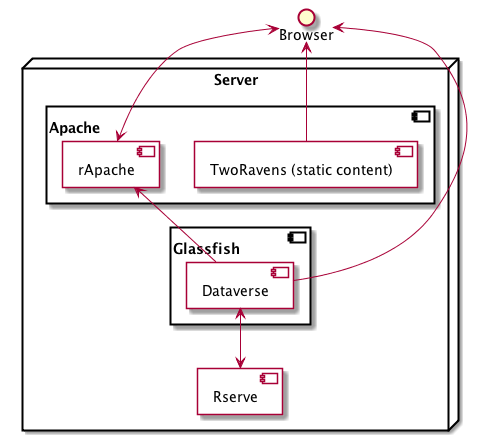
If you install all components on a single server and front Glassfish with Apache (see “Network Ports” under the Configuration section), the component and data flow diagram might looks something like this:
In addition to Rserve, there are 14 more R library packages that the TwoRavens R
code requires in order to run. These in turn require 30 more as their own dependencies,
so a total of 45 packages must be installed. “Installed” in the
context of an R package means R must download the source code from the CRAN code repository and compile it locally. This
historically has been the trickiest, least stable part of the installation process,
since the packages in question are being constantly (and independently) developed.
This means that every time you attempt to install these packages, you are building
from potentially different versions of the source code. An incompatibility introduced
between any two of the packages can result in a failure to install. In this release
we have attempted to resolve this by installing the specific versions of the R
packages that have been proven to work together. If you have attempted to
install TwoRavens in the past, and it didn’t work, please see the part of
section 1.b. where we explain how to completely erase all the previously
built packages.
1. Prerequisites
a. httpd (Apache):
It’s probably installed already, but if not:
yum install httpd
This rApache configuration does not work with SELinux. Execute the following commands to disable SELinux:
setenforce permissive
getenforce
(Note: If you can get rApache to work with SELinux, we encourage you to make a pull request! Please see the SELinux section of the Developer Guide to get started.)
If you choose to serve TwoRavens and run rApache under https, a “real” signed certificate (as opposed to self-signed) is recommended.
For security reasons, directory listing needs to be disabled on the web documents folder served by Apache:
In the main Apache configuration file (/etc/httpd/conf/httpd.conf in the default setup), find the section that configures your web directory. For example, if the DocumentRoot, defined elsewhere in the file, is set to the default "/var/www/html", the opening line of the section will look like this:
<Directory "/var/www/html">
Find the Options line in that section, and make sure that it doesn’t contain the Indexes statement.
For example, if the options line in your configuration is
Options Indexes FollowSymLinks
change it to
Options FollowSymLinks
b. R:
The simplest way to install R on RHEL/CentOS systems is with yum, using the EPEL repository:
yum install epel-release
yum install R-core R-core-devel
Both EPEL6 and EPEL7 currently provide R 3.5, which has been tested and appears to work well. R 3.4, offered by EPEL until also works well. We recommend using the currently available EPEL version for all the new installations. But if you already have a working R 3.4 installation from EPEL and you don’t have a specific need to upgrade, you may lock that version in place using the yum-versionlock yum plugin, or simply add this line to the “epel” section of /etc/yum.repos.d/epel.repo:
exclude=R-*,openblas-*,libRmath*
RHEL users may need to log in to their organization’s respective RHN interface, find the particular machine in question and:
- click on “Subscribed Channels: Alter Channel Subscriptions”
- enable EPEL, Server Extras, Server Optional
If you are upgrading an existing installation of TwoRavens, or if you have attempted to install it in the past and it didn’t work, we strongly recommend reinstalling R completely, erasing all the extra R packages that may have been already built.
Uninstall R:
yum erase R-core R-core-devel
Wipe clean any R packages that were left behind:
rm -rf /usr/lib64/R/library/*
rm -rf /usr/share/R/library/*
... then re-install R with yum install
c. rApache:
We maintain the following rpms of rApache, built for the following version of RedHat/CentOS distribution:
For RHEL/CentOS 6 and R 3.4, download rapache-1.2.6-rpm0.x86_64.rpm and install it with:
yum install rapache-1.2.6-rpm0.x86_64.rpm
For RHEL/CentOS 6 and R 3.5, download rapache-1.2.9_R-3.5-RH6.x86_64.rpm and install it with:
yum install rapache-1.2.9_R-3.5-RH6.x86_64.rpm
If you are using RHEL/CentOS 7 and R 3.4, download rapache-1.2.7-rpm0.x86_64.rpm and install it with:
yum install apache-1.2.7-rpm0.x86_64.rpm
If you are using RHEL/CentOS 7 in combination with R 3.5, download rapache-1.2.9_R-3.5.x86_64.rpm and install it with:
yum install rapache-1.2.9_R-3.5.x86_64.rpm
Please note: The rpms above cannot be guaranteed to work on your system. You may have a collection of system libraries installed on your system that will create a version conflict. If that’s the case, or if you are trying to install on an operating system that’s listed above, do not despair: simply build rApache from source . Make sure to build with the R that’s the same version you are planning on using.
d. Install the build environment for R:
Once again, extra R packages will need to be built from sources. Make sure you have the standard GNU compilers installed: gcc, gcc-c++ and gcc-gfortran.
One of the required packages needed /bin/ed. The R package build script needs /usr/bin/wget. If these are missing, the rpms can be installed with:
yum install ed wget
Depending on how your system was originally set up, you may end up needing to install some other missing rpms. We’ll explain how to troubleshoot compiler errors caused by missing libraries and/or executables.
2. Install Extra R Packages
We provide a shell script (r-setup.sh) that will try to install all the needed packages. Note: the script is now part of the TwoRavens distribution (it used to be in the Dataverse source tree).
The script will attempt to download the packages from CRAN (or a mirror), so the system must have access to the Internet.
In order to run the script:
Download the current snapshot of the “dataverse-distribution” branch of TwoRavens from github: https://github.com/IQSS/TwoRavens/archive/dataverse-distribution.zip. Once again, it is important that you download the “dataverse-distribution” branch, and NOT the master distribution! Unpack the zip file, then run the script:
unzip dataverse-distribution.zip
cd TwoRavens-dataverse-distribution/r-setup
chmod +x r-setup.sh
./r-setup.sh
See the section II. of the Appendix for trouble-shooting tips.
For the Rserve package the setup script will also create a system user
rserve, and install the startup script for the
daemon (/etc/init.d/rserve). The script will skip this part, if
this has already been done on this system (i.e., it should be safe to
run it repeatedly).
Note that the setup will set the Rserve password to “rserve”.
Rserve daemon runs under a non-privileged user id, and there appears to be a
very limited potential for security damage through unauthorized access. It is however
still a good idea to change the password. The password is specified in /etc/Rserv.pwd.
Please see Rserve documentation for more
information on password encryption and access security.
Make sure the rserve password is correctly specified in the domain.xml of your Dataverse:
<jvm-options>-Ddataverse.rserve.password=...</jvm-options>
3. Install the TwoRavens Application
a. download and unzip the application
(though you may have already done so, in step 2. above - see the instructions there).
b. Rename the resulting directory “dataexplore” ...
...and place it in the web root directory of your apache server. We’ll assume /var/www/html/dataexplore in the examples below:
mv TwoRavens-dataverse-distribution /var/www/html/dataexplore
c. run the installer
A scripted, interactive installer is provided at the top level of the TwoRavens distribution.
The installer will ask you to provide the following:
| Setting | default | Comment |
|---|---|---|
| TwoRavens directory | /var/www/html/dataexplore |
File directory where TwoRavens is installed. |
| Apache config dir. | /etc/httpd |
rApache config file for TwoRavens will be placed under conf.d/ there. |
| Apache web dir. | /var/www/html |
|
| rApache/TwoRavens URL | http://{your hostname}:80 |
URL of the Apache server hosting TwoRavens and rApache. |
| Dataverse URL | http://{your hostname}:8080 |
URL of the Dataverse that integrates with this TwoRavens installation. |
Please note the default values above. The installer assumes
- that you are running both the Dataverse and TwoRavens/rApache on the same host;
- the default ports for Apache (80) and Glassfish that is serving your Dataverse (8080);
http(nothttps!) for both .
This configuration is recommended if you are simply trying out/testing Dataverse and TwoRavens. Accept all the defaults, and you should have a working installation in no time.
However, if you are planning to use this installation to actually serve data to
users, you’ll most likely want to run under HTTPS. Please refer to the discussion
in the Appendix, I. for more information on setting it up. Configuring HTTPS
takes a little extra work. But note that the TwoRavens configuration
can actually end up being simpler. If you use our recommended configuration for
HTTPS (described in the Appendix), both the “TwoRavens URL” and “Dataverse URL”
will be the same: https://{your hostname}.
Run the installer as:
cd /var/www/html/dataexplore
chmod +x install.pl
./install.pl
Once everything is installed and configured, the installer script will print out a confirmation message with the URL of the TwoRavens application. For example:
The application URL is https://server.dataverse.edu/dataexplore/gui.html
d. Version conflict check (preprocess.R)
One of the R files in the TwoRavens distribution, rook/preprocess/preprocess.R is used by both TwoRavens and
Dataverse. Dataverse application maintains its own copy of the file, <DOMAIN DIRECTORY>/applications/dataverse-<VERSION>/WEB-INF/classes/edu/harvard/iq/dataverse/rserve/scripts/preprocess.R.
(Why not share the file from the same location? Because the two applications
can potentially be installed on 2 different servers).
Compare the two files. It is important that the two copies are identical.
If different:
the TwoRavens version wins. Meaning, you need to copy the version supplied with this TwoRavens distribution and overwrite the Glassfish version (above); then restart Glassfish.
unless this is a brand new Dataverse installation, it may have cached summary statistics fragments that were produced with the older version of this R code. You must remove all such cached files:
cd <DATAVERSE FILES DIRECTORY>
find . -name '*.prep' | while read file; do /bin/rm $file; done
(Yes, this is a HACK! We are working on finding a better way to ensure this compatibility between TwoRavens and Dataverse!)
e. Enable TwoRavens Button in Dataverse
Now that you have installed TwoRavens, you can make it available to your users by adding it an “external tool” for your Dataverse installation. (For more on external tools in general, see the External Tools section.)
First, download twoRavens.json as a starting point and edit toolUrl in that external tool manifest file to be the URL where you want TwoRavens to run. This is the URL reported by the installer script (as in the example at the end of step c., above).
Once you have made your edits, make the tool available within Dataverse with the following curl command (assuming twoRavens.json is in your current working directory):
curl -X POST -H 'Content-type: application/json' --upload-file twoRavens.json http://localhost:8080/api/admin/externalTools
Once enabled, an “Explore” dropdown will appear next to ingested tabular data files a “TwoRavens” button; clicking it will redirect the user to the instance of TwoRavens, initialized with the data variables from the selected file.
f. Perform a quick test of TwoRavens functionality
Ingest the dummy data file 50by1000.dta (supplied in the Dataverse source tree in
dataverse/scripts/search/data/tabular). If successfully ingested as tabular data,
the file should appear on the Dataset page as follows:

If the file does NOT appear as Tabular Data - if it is shown as Stata/dta, and no tabular attributes - the numbers of Variables and Observations and the UNF - are being displayed, try to refresh the page a couple of times. If that doesn’t change the view to Tabular, it likely means that something went very wrong with the tabular ingest. Consult the Glassfish server log for any error messages that may explain the failure.
If the file is showing as Tabular Data, but the Explore button isn’t present,
double-check that the steps in e., above, were correctly performed.
Otherwise, click on the Explore button. This will open TwoRavens in a new browser window.
If the application initializes successfully, you should see the “data pebbles” representing
the first 3 variables in the file:
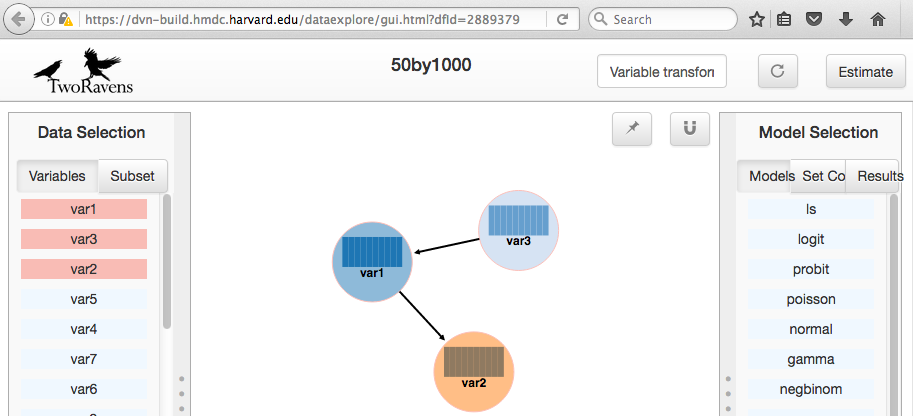
If instead TwoRavens opens with an empty view - no variables listed on the left, and/or no “data pebbles” in the middle panel, we’ll provide some diagnostics tips further below.
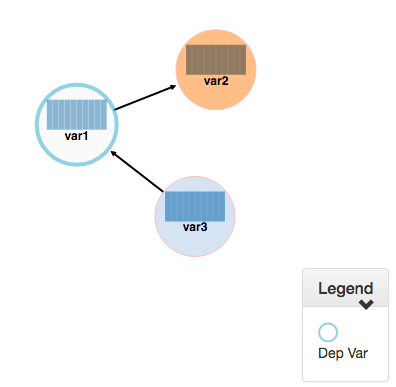
Otherwise, mouse over var1, and click on Dep Var, selecting the variable as “dependent”:
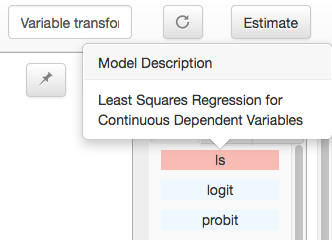
Then select ls from the list of models on the right:
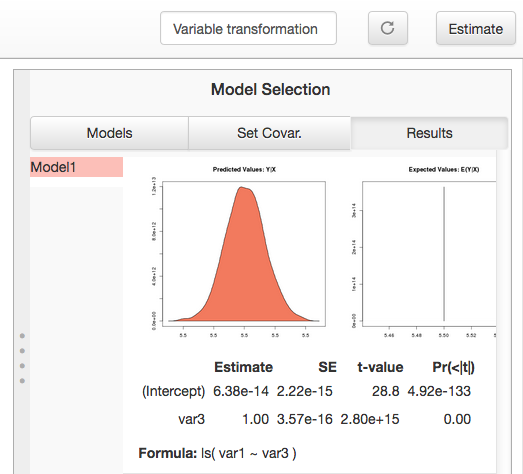
Then click the Estimate button, above. If the model is successfully executed,
the results will appear in a new popup panel, with some generated graph images, as shown below:
Troubleshooting:
If TwoRavens fails to initialize properly:
Symptom: instead of the “data pebbles” display shown in the second image, above, you are getting an empty view:
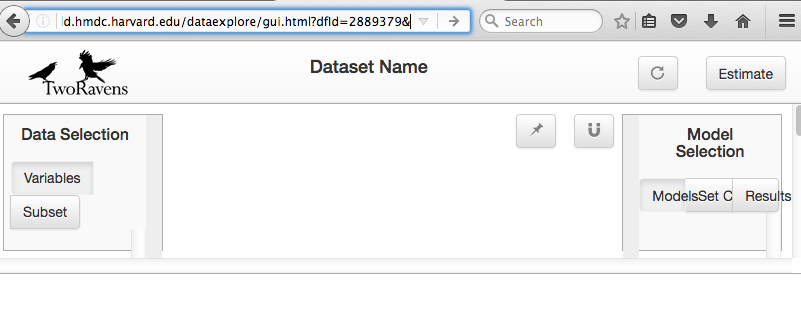
A very likely cause of this condition is TwoRavens not being able to obtain the metadata describing the variables from your Dataverse. Specifically, the “preprocessed summary statistics”.
To diagnose: note the value of the dfId URL parameter in the view above.
Try to request the preprocessed fragment by going to the API end point directly:
<YOUR DATAVERSE URL>/api/access/datafile/<FILE ID>?format=prep
Where the <FILE ID> is the value of the dfId parameter from the previous view. You should get the output that looks like this:
{"dataset":{"private":false},"variables":{"var1":{"plottype":"bar","plotvalues":{"1":100,"2":100,"3":100,"4":100,"5":100,"6":100,"7":100,"8":100,"9":100,"10":100},"varnamesSumStat":"var1","median":5.5,"mean":5.5,"mode":"1","max":10,"min":1,"invalid":0,"valid":1000,"sd":2.87371854193452,"uniques":10,"herfindahl":0.1,"freqmode":100,"fewest":"1","mid":"1","freqfewest":"100","freqmid":"100","numchar":"numeric","nature":"ordinal","binary":"no","interval":"discrete","varnamesTypes":"var1","defaultInterval":"discrete","defaultNumchar":"numeric","defaultNature":"ordinal","defaultBinary":"no"},"var3":{"plottype":"bar","plotvalues":
...
If you are getting an error message instead, this is likely an Rserve connection problem.
Consult the Glassfish server log for any Rserve-related “connection refused” messages.
See if Rserve is running, and start it with service rserve start, if necessary.
Check if the Rserve host name, username and password in the Glassfish configuration match
the actual Rserve configuration. (this is discussed in the section 2. of the guide).
Correct this, if necessary, then try again.
If you ARE getting JSON output, but the TwoRavens view is still broken:
- Look closely at the very beginning of the JSON fragment. Does it have the
{"private":false}entry, as shown in the example above? If not, this likely an R code version mismatch, described in section3.d., above. Correct the problem as described there, then try again. - If the JSON looks exactly as the fragment above, yet still no data pebbles - enable the JavaScript error console in the TwoRavens window, and try again. Look for any error messages; and, specifically, for any URLs that TwoRavens is failing to access. Look for the debugging entry that shows TwoRavens attempting to download the
format=prepfragment. Does the URL have the correct host name, port and/or the protocol (http vs. https)? If not, re-run the installer, specifying the correct Dataverse URL, and try again.
Symptom: the variables view is initialized properly, but no model output appears when you click Estimate, with or without error messages.
- Make sure you properly selected the dependent variable (var1) and the model (ls).
- Consult the Apache error log files (
error_logand/orssl_error_log, in/var/log/httpd) for any error messages. Possible error condition may include: missing R packages (double-check that the R setup, in step2.completed without errors);selinux(“Secure Linux”) errors related to the rApache shared libraries, or directory permissions (disable Selinux, as described in1.a.)
4. Appendix
I. Ports configuration discussion
By default, Glassfish will install itself on ports 8080 and 8181 (for
HTTP and HTTPS, respectively). Apache will install itself on port 80
(the default port for HTTP). Under this configuration, your Dataverse will
be accessible at http://{your host}:8080, and rApache at
http://{your host}/. The TwoRavens installer, above, will default to these
values (and assume you are running both the Dataverse and TwoRavens/rApache on
the same host).
This configuration is the easiest to set up if you are simply
trying out/testing the Dataverse and TwoRavens integration. Accept all the
defaults, and you should have a working installation in no
time. However, if you are planning to use this installation to
actually serve data to real users, you will most likely want to run your Dataverse
on a standard port; and to use HTTPS. It is definitely possible to configure
Glassfish to serve the application under HTTPS on port 443. However, we
do not recommend this setup! For at least 2 reasons: 1. Running Glassfish on
port 443 will require you to run it as root user; which should be avoided,
if possible, for reasons of security. Also, 2) installing SSL certificates under
Glassfish is unnecessarily complicated. The alternative configuration that
we recommend is to “hide” your Glassfish behind Apache. In this setup Apache
serves as the HTTPS front running on port 443, proxying the traffic to
Glassfish using mod_proxy_ajp; and Glassfish is running as
an non-privileged user on a high port that’s not accessible from the outside.
Unlike Glassfish, Apache has a mechanism for running on a privileged port (in
this case, 443) as a non-privileged user. It is possible to use this
configuration, and have this Apache instance serve TwoRavens and rApache too,
all on the same server. Please see “Network Ports” under the Configuration
section, and the Shibboleth section of the Installation Guide for more
information and configuration instructions.
II. What the r-setup.sh script does:
The script uses the list of 45 R library packages and specified
package versions, supplied in TwoRavens/r-setup/package-versions.txt to
replicate the library environment that has been proven to work on the Dataverse
servers.
If any packages fail to build, the script will alert the user.
For every package, the (potentially verbose) output of the build process is saved in
its own file, RINSTALL.{PACKAGE NAME}.LOG. So if, for example, the package
Zelig fails to install, the log file RINSTALL.Zelig.LOG should
be consulted for any error messages that may explain the reason for the failure;
such as a missing library, or a missing compiler, etc. Be aware that diagnosing
compiler errors will require at least some programming and/or system administration
skills.
III. What the install.pl script does:
The steps below are performed by the install.pl script. Provided for reference only!
The instruction below could be used to configure it all by hand, if necessary, or
to verify that the installer has done it correctly.
Once again: normally you would NOT need to individually perform the steps below!
TwoRavens is distributed with a few hard-coded host and directory names. So these need to be replaced with the values specific to your system.
In the file /var/www/html/dataexplore/app_ddi.js the following 3 lines need to be
edited:
var production=false;changed to
true;hostname="localhost:8080";changed to point to the dataverse app, from which TwoRavens will be obtaining the metadata and data files. (don’t forget to change 8080 to the correct port number!)
var rappURL = "http://0.0.0.0:8000/custom/";changed to the URL of your rApache server, i.e.
"http(s)://<rapacheserver>:<rapacheport>/custom/";
In dataexplore/rook the following files need to be edited:
rookdata.R, rookzelig.R, rooksubset.R, rooktransform.R, rookselector.R, rooksource.R
replacing every instance of production<-FALSE line with production<-TRUE.
(yeah, that’s why we provide that installer script...)
In dataexplore/rook/rooksource.R the following line:
setwd("/usr/local/glassfish4/glassfish/domains/domain1/docroot/dataexplore/rook")
needs to be changed to:
setwd("/var/www/html/dataexplore/rook")
(or your dataexplore directory, if different from the above)
In dataexplore/rook/rookutils.R the following lines need to be edited:
url <- paste("https://beta.dataverse.org/custom/preprocess_dir/preprocessSubset_",sessionid,".txt",sep="")
and
imageVector[[qicount]]<<-paste("https://beta.dataverse.org/custom/pic_dir/", mysessionid,"_",mymodelcount,qicount,".png", sep = "")
changing the URL to reflect the correct location of your rApache instance. make sure that the protocol (http vs. https) and the port number are correct too, not just the host name!
Next, in order to configure rApache to serve several TwoRavens “mini-apps”,
the installer creates the file tworavens-rapache.conf in the Apache’s /etc/httpd/conf.d directory with the following configuration:
RSourceOnStartup "/var/www/html/dataexplore/rook/rooksource.R"
<Location /custom/zeligapp>
   SetHandler r-handler
   RFileEval /var/www/html/dataexplore/rook/rookzelig.R:Rook::Server$call(zelig.app)
</Location>
<Location /custom/subsetapp>
   SetHandler r-handler
   RFileEval /var/www/html/dataexplore/rook/rooksubset.R:Rook::Server$call(subset.app)
</Location>
<Location /custom/transformapp>
   SetHandler r-handler
   RFileEval /var/www/html/dataexplore/rook/rooktransform.R:Rook::Server$call(transform.app)
</Location>
<Location /custom/dataapp>
   SetHandler r-handler
   RFileEval /var/www/html/dataexplore/rook/rookdata.R:Rook::Server$call(data.app)
</Location>
The following directories are created by the installer to store various output files produced by TwoRavens:
mkdir --parents /var/www/html/custom/pic_dir

mkdir --parents /var/www/html/custom/preprocess_dir

mkdir --parents /var/www/html/custom/log_dir
The ownership of the TwoRavens directories is changed to user apache:
chown -R apache.apache /var/www/html/custom

chown -R apache /var/www/html/dataexplore
Finally, the installer restarts Apache, for all the changes to take effect:
service httpd restart