Make Data Count
Support for Make Data Count is a feature of Dataverse that is described in the Make Data Count section of the Admin Guide. In order for developers to work on the feature, they must install Counter Processor, a Python 3 application, as described below. Counter Processor can be found at https://github.com/CDLUC3/counter-processor
Contents:
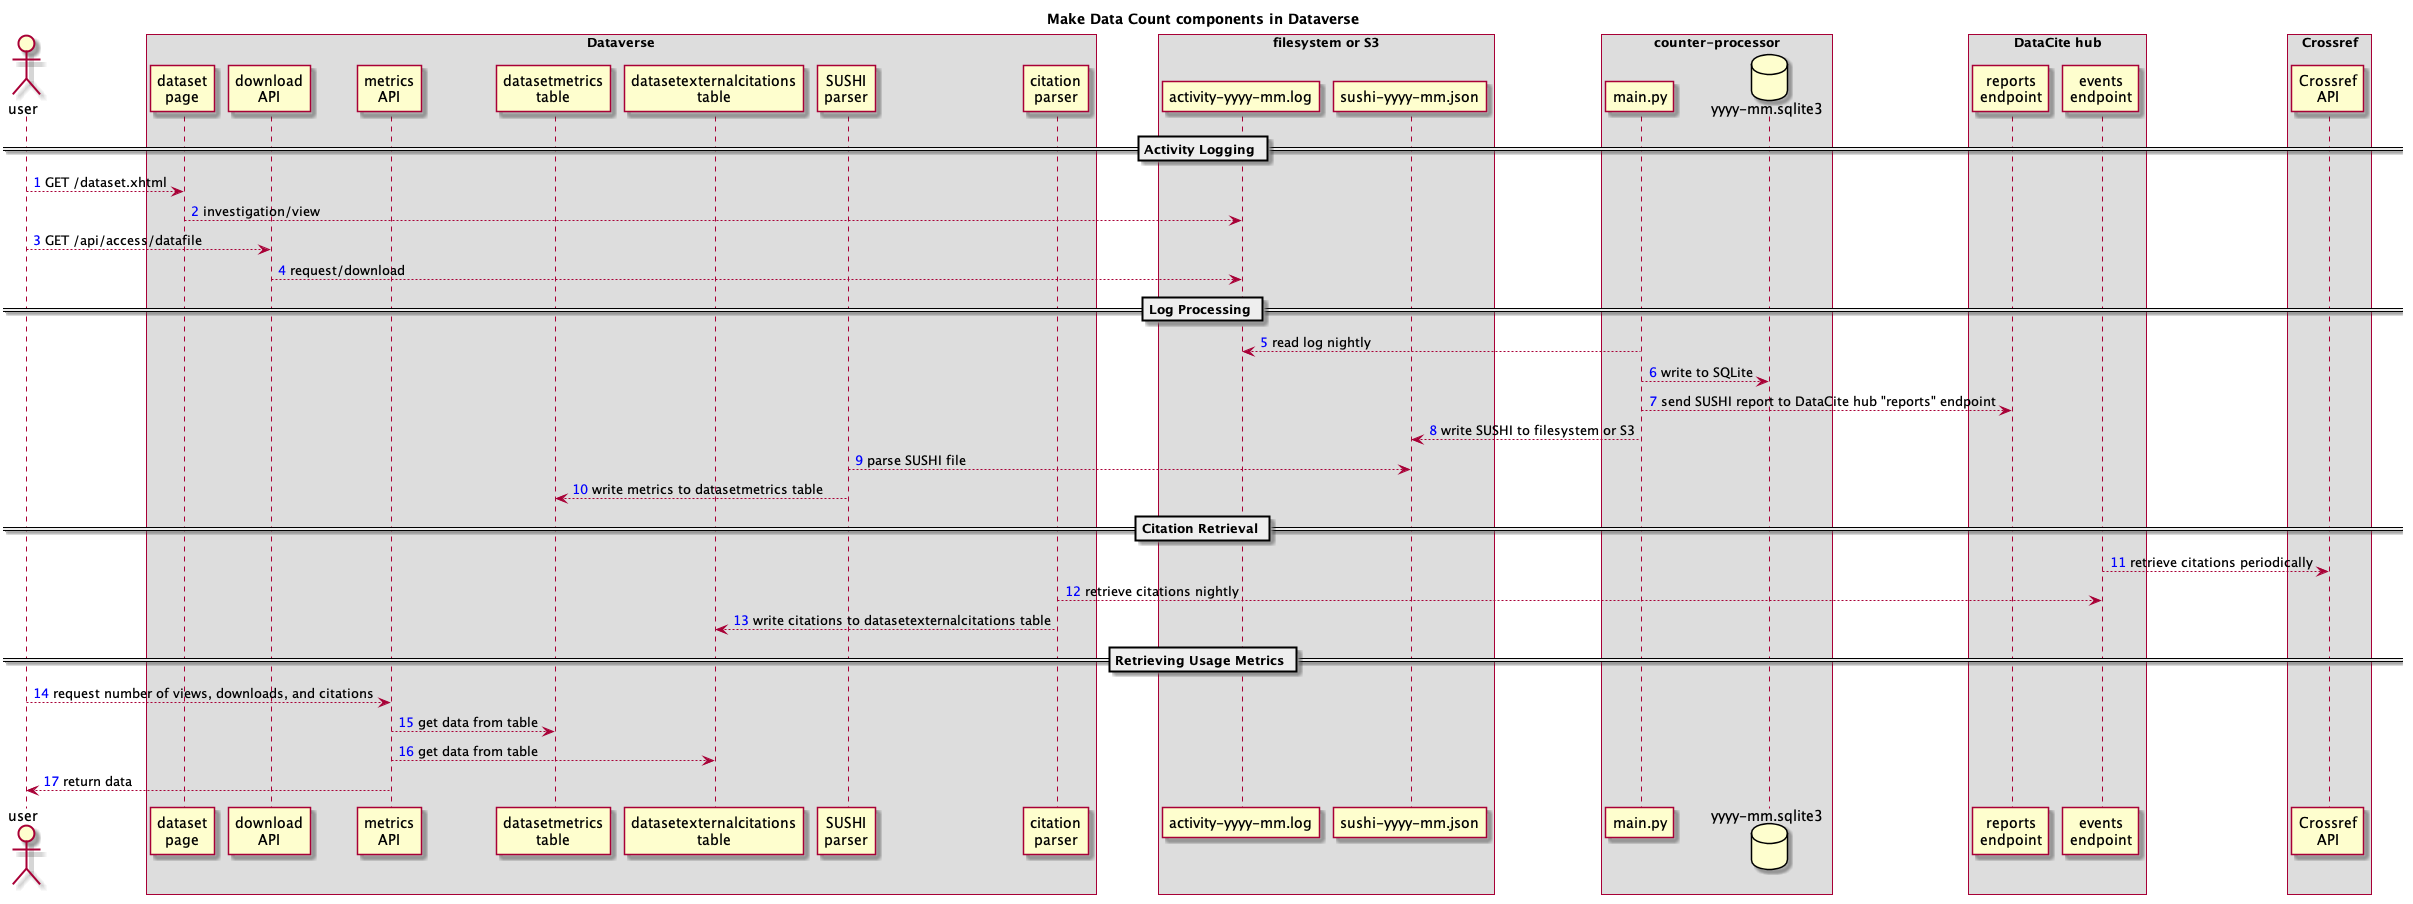
Architecture
There are many components involved in Dataverse’s architecture for Make Data Count as shown in the diagram below.
Dev Environment Setup for Make Data Count
Generate Fake Metrics Only
The quickest way to put populate tables with some data is to run the MakeDataCountApiIT integration test. For more on running integration tests see the Testing section. This will populate views and downloads.
To insert a citation you could insert a row like below, changing “72” in the example below with the dataset id for your dataset.
INSERT INTO datasetexternalcitations (id, citedbyurl, dataset_id) VALUES (1, 'https://doi.org/10.1007/s12520-017-0578-2', 72);
Full Setup
The recommended way to work on the Make Data Count feature is to spin up an EC2 instance that has both Dataverse and Counter Processor installed. Go to the Deployment page for details on how to spin up an EC2 instance and make sure that your Ansible file is configured to install Counter Processor before running the “create” script.
(Alternatively, you can try installing Counter Processor in Vagrant. setup-counter-processor.sh might help you get it installed.)
After you have spun to your EC2 instance, set :MDCLogPath so that Dataverse creates a log for Counter Processor to operate on. For more on this database setting, see the Configuration section of the Installation Guide.
Next you need to have Dataverse add some entries to the log that Counter Processor will operate on. To do this, click on some published datasets and download some files.
Next you should run Counter Processor to convert the log into a SUSHI report, which is in JSON format. Before running Counter Processor, you need to put a configuration file into place. As a starting point use counter-processor-config.yaml and edit the file, paying particular attention to the following settings:
log_name_patternYou might want something like/usr/local/glassfish4/glassfish/domains/domain1/logs/counter_(yyyy-mm-dd).logyear_monthYou should probably set this to the current month.output_fileThis needs to be a directory that the “glassfish” Unix user can read but that the “counter” user can write to. In dev, you can probably get away with “/tmp” as the directory.platformOut of the box from Counter Processor this is set toDashbut we’re not 100% sure if this should be “Dataverse” or a branch for a Dataverse installation like “LibreScholar”.upload_to_hubThis should be “False” unless you are testing sending SUSHI reports to the DataCite hub.simulate_dateYou should probably set this to tomorrow.
Once you are done with your configuration, you can run Counter Processor like this:
sudo -i
su - counter
cd /usr/local/counter-processor-0.0.1
CONFIG_FILE=counter-processor-config.yaml python36 main.py
(Please note that the Counter Processor README says you can also pass in values like START_DATE, END_DATE etc. at the command line if you find this to be more convenient.)
After main.py has finished, you should see output that a JSON file has been placed in the directory you specified in output_file. Next, pass this JSON file to curl like this, substituting the DOI of the dataset you’re testing with:
curl -X POST 'http://localhost:8080/api/admin/makeDataCount/:persistentId/addUsageMetricsFromSushiReport?reportOnDisk=/tmp/sushi_sample_logs.json&persistentId=doi:10.5072/FK2/BL2IBM
(Note that in production the persistentId of a dataset is not passed. Instead the PIDs for the datasets are pulled out of the JSON file.)
Assuming the curl command above worked, you should be able to retrieve the views and downloads via API like this, substituting the metric you’re interested in (viewsTotal, viewsUnique, downloadsTotal, downloadsUnique) and the DOI of the dataset you’re testing with:
curl -X POST 'http://localhost:8080/api/datasets/:persistentId/makeDataCount/viewsTotal/2019-01&persistentId=doi:10.5072/FK2/BL2IBM
If all this is working and you want to send data to the test instance of the Datacite hub, change upload_to_hub to “True” and contact support@datacite.org to get a JSON Web Token (JWT) to test with. Counter Processor should send the SUSHI reports for you but if you need to troubleshoot sending the reports manually, you can try the following curl command, substituting your JWT:
curl --header "Content-Type: application/json; Accept: application/json" -H "Authorization: Bearer $JSON_WEB_TOKEN" -X POST https://api.test.datacite.org/reports/ -d @sushi_report.json
For how to put citations into your dev database and how to get them out again, see Configuring Dataverse for Make Data Count Citations section in Make Data Count of the Admin Guide.
Testing Make Data Count and Dataverse
A developer running Counter Processor alongside Dataverse for development or testing purposes will notice that once the raw Dataverse logs have been processed, there is no straightforward way to re-test those same logs.
The first thing to fix is to clear two files from Counter Processor state folder, statefile.json and counter_db_[yyyy-mm].sqlite3
Second, if you are also sending your SUSHI report to Make Data Count, you will notice that re-running Counter Processor will not update the information logged on their servers. This is due to us clearing the state of Counter Processor, which in turn causes Counter Processor to send incorrectly structured requests to Make Data Count. The easiest way to resolve this issue is to DELETE the record Counter Processor has created on Make Data Count:
curl -H "Authorization: Bearer $JSON_WEB_TOKEN" -X DELETE https://$MDC_SERVER/reports/$REPORT_ID
To get the REPORT_ID, look at the logs generated in /usr/local/counter-processor-0.0.1/tmp/datacite_response_body.txt
To read more about the Make Data Count api, see https://github.com/datacite/sashimi
You can compare the MDC metrics display with Dataverse’s original by toggling the :DisplayMDCMetrics setting (true by default to display MDC metrics).
Resources
The original issue for adding Make Data Count support is https://github.com/IQSS/dataverse/issues/4821