Dataverse Collection Management
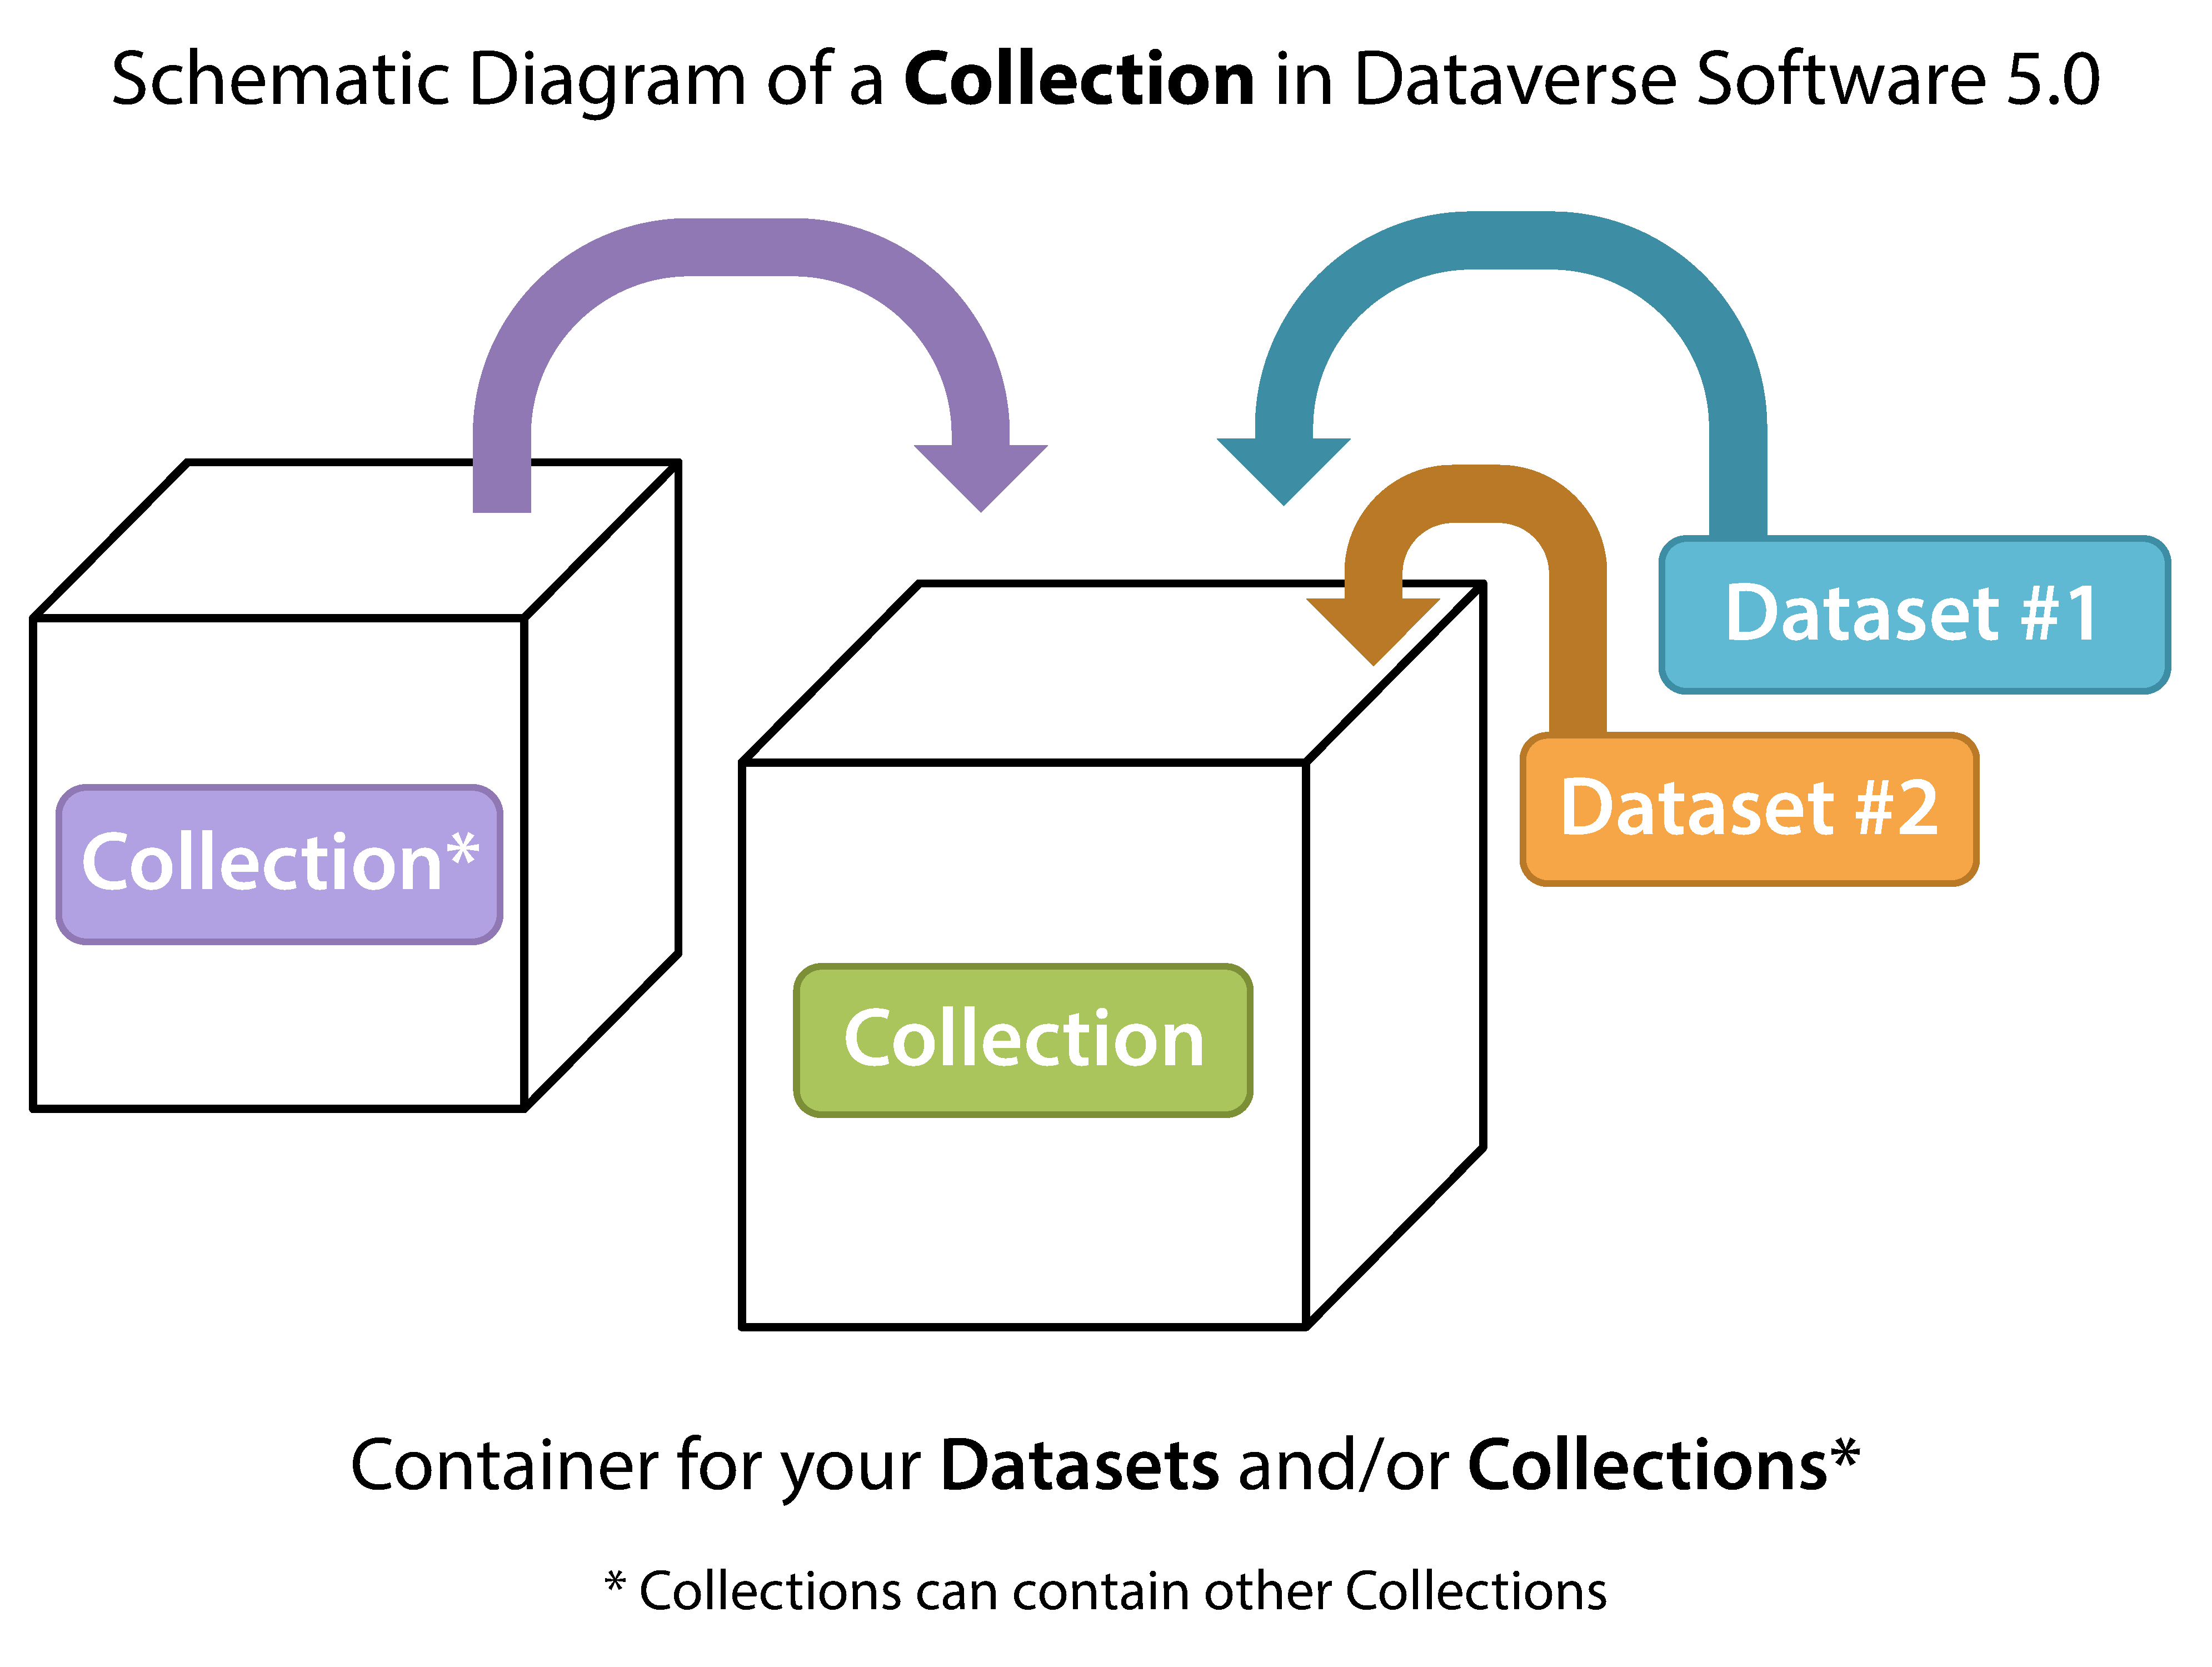
A Dataverse collection is a container for datasets (research data, code, documentation, and metadata) and other Dataverse collections, which can be setup for individual researchers, departments, journals and organizations.
Once a user creates a Dataverse collection they, by default, become the administrator of that Dataverse collection. The Dataverse collection administrator has access to manage the settings described in this guide.
Create a New Dataverse Collection
Creating a Dataverse collection is easy but first you must be a registered user (see Account Creation + Management). Once you are logged in, click on the “Add Data” button, or “Add Data” navbar link and in the dropdown menu select “New Dataverse”.
- Fill in the following fields on the “New Dataverse” page (required fields in the form are denoted by a red asterisk, next to the label):
Host Dataverse: Select a Dataverse collection you would like to create the new Dataverse collection in, by default the root Dataverse collection is selected if you click the Add Data button from the root Dataverse collection, your My Data page, the Add Data link in the navbar, or the Add a dataset button on the custom homepage (if configured), but you can select any Dataverse collection for which you the proper permissions to create Dataverse collections.
Dataverse Name: Enter the name of your Dataverse collection.
Affiliation: Add any affiliation that can be associated with this particular Dataverse collection (e.g., project name, institute name, department name, journal name, etc). This is automatically filled out if you have added an affiliation for your user account.
Identifier: This is an abbreviation, usually lower-case, that becomes part of the URL for the new Dataverse collection. Special characters (~,`, !, @, #, $, %, ^, &, and *) and spaces are not allowed. Note: if you change this field in the future, the URL for your Dataverse collection will change (http//…/’identifier’), which will break older links to the page.
Category: Select a category that best describes the type of Dataverse collection this will be. For example, if this is a Dataverse collection for an individual researcher’s datasets, select Researcher. If this is a Dataverse collection for an institution, select Organization or Institution.
Email: This is the email address that will be used as the contact for this particular Dataverse collection. You can have more than one contact email address for your Dataverse collection.
Description: Provide a description of this Dataverse collection. This will display on the landing page of your Dataverse collection and in the search result list. The description field supports certain HTML tags, if you’d like to format your text (<a>, <b>, <blockquote>, <br>, <code>, <del>, <dd>, <dl>, <dt>, <em>, <hr>, <h1>-<h3>, <i>, <img>, <kbd>, <li>, <ol>, <p>, <pre>, <s>, <sup>, <sub>, <strong>, <strike>, <u>, <ul>).
Dataset Metadata Langauge: (If enabled) Select which language should be used when entering dataset metadata, or leave that choice to dataset creators.
Guestbook Entry Option: (If enabled) Select whether guestbooks are displayed when a user requests access to restricted file(s) or when they initiate a download.
- Choose the sets of Metadata Fields for datasets in this Dataverse collection:
By default the metadata elements will be from the host Dataverse collection that this new Dataverse collection is created in.
The Dataverse Software offers metadata standards for multiple domains. To learn more about the metadata standards in the Dataverse Software please check out the Appendix.
Most metadata fields can be hidden or can be selected as required or optional. Some fields may be selected as conditionally required, depending on metadata options chosen for the Dataverse installation.
Selected metadata fields are also used to pick which metadata fields you would like to use for creating Dataset Templates: after you finish creating your Dataverse collection.
- Choose which metadata fields will be used as browse/search facets on your Dataverse collection:
These facets will allow users browsing or searching your Dataverse collection to filter its contents according to the fields you have selected. For example, if you select “Subject” as a facet, users will be able to filter your Dataverse collection’s contents by subject area.
By default, the facets that will appear on your Dataverse collection’s landing page will be from the host Dataverse collection that this new Dataverse collection was created in, but you can add or remove facets from this default.
Click the “Create Dataverse” button and you’re done!
Edit Dataverse Collection
To edit your Dataverse collection, navigate to your Dataverse collection’s landing page and select the “Edit Dataverse” button, where you will be presented with the following editing options:
General Information: edit name, affiliation, identifier, category, contact email, description, metadata fields, and browse/search facets for your Dataverse collection
Theme: upload a logo for your Dataverse collection, add a link to your department or personal website, add a custom footer image, and select colors for your Dataverse collection in order to brand it
Widgets: get code to add to your website to have your Dataverse collection display on it
Permissions: give other users permissions to your Dataverse collection, i.e.-can edit datasets, and see which users already have which permissions for your Dataverse collection
Dataset Templates: these are useful when you want to provide custom instructions on how to fill out fields or have several datasets that have the same information in multiple metadata fields that you would prefer not to have to keep manually typing in
Dataset Guestbooks: allows you to collect data about who is downloading the files from your datasets
Featured Dataverse collections: if you have one or more Dataverse collection, you can use this option to show them at the top of your Dataverse collection page to help others easily find interesting or important Dataverse collections
Delete Dataverse: you are able to delete your Dataverse collection as long as it is not published and does not have any draft datasets
General Information
The General Information page is how you edit the information you filled in while creating your Dataverse collection. If you need to change or add a contact email address, this is the place to do it. Additionally, you can update the metadata elements used for datasets within the Dataverse collection, change which metadata fields are hidden, required, or optional, and update the facets you would like displayed for browsing the Dataverse collection. If you plan on using templates, you need to select the metadata fields on the General Information page.
Tip: The metadata fields you select as required will appear on the Create Dataset form when someone goes to add a dataset to the Dataverse collection.
Theme
The Theme features provides you with a way to customize the look of your Dataverse collection. You can:
Inherit the theme from the parent Dataverse collection. This option is helpful if you’d like consistency across several Dataverse collections that all share the same parent.
Add or update a logo image, which will appear at the top of your Dataverse collection.
Add or update a thumbnail image, which will appear on featured dataverses of your Dataverse collection.
Add or update a footer image, which will appear at the bottom of your Dataverse collection.
Change the colors of the background, links, and text within the header of your Dataverse collection.
Add or update the tagline for your Dataverse collection, which can provide more information about your organization, journal, institution, etc.
Add a URL for a website that will be accessed when visitors click the tagline text.
Supported image types for logo images and footer images are JPEG, TIFF, or PNG and should be no larger than 500 KB. The maximum display size for an image file in a Dataverse collection’s theme is 940 pixels wide by 120 pixels high.
Widgets
The Widgets feature provides you with code for you to put on your personal website to have your Dataverse collection displayed there. There are two types of Widgets for a Dataverse collection, a Dataverse collection Search Box widget and a Dataverse collection Listing widget. Once a Dataverse collection has been published, from the Widgets tab on the Dataverse collection’s Theme + Widgets page, it is possible to copy the code snippets for the widget(s) you would like to add to your website. If you need to adjust the height of the widget on your website, you may do so by editing the heightPx=500 parameter in the code snippet.
Dataverse Collection Search Box Widget
The Dataverse Collection Search Box Widget will add a search box to your website that is linked to your Dataverse collection. Users are directed to your Dataverse collection in a new browser window, to display the results for search terms entered in the input field.
Dataverse Collection Listing Widget
The Dataverse Collection Listing Widget provides a listing of all your Dataverse collections and datasets for users to browse, sort, filter and search. When someone clicks on a Dataverse collection or dataset in the widget, it displays the content in the widget on your website. They can download data files directly from the datasets within the widget. If a file is restricted, they will be directed to your Dataverse installation to log in, instead of logging in through the widget on your website.
Adding Widgets to an OpenScholar Website
Log in to your OpenScholar website
Either build a new page or navigate to the page you would like to use to show the Dataverse collection widgets.
Click on the Settings Cog and select Layout
At the top right, select Add New Widget and under Misc. you will see the Dataverse Collection Search Box and the Dataverse Collection Listing Widgets. Click on the widget you would like to add, fill out the form, and then drag it to where you would like it to display in the page.
Roles & Permissions
Dataverse installation user accounts can be granted roles that define which actions they are allowed to take on specific Dataverse collections, datasets, and/or files. Each role comes with a set of permissions, which define the specific actions that users may take.
Roles and permissions may also be granted to groups. Groups can be defined as a collection of Dataverse installation user accounts, a collection of IP addresses (e.g. all users of a library’s computers), or a collection of all users who log in using a particular institutional login (e.g. everyone who logs in with a particular university’s account credentials).
The user who creates a dataverse is given the “Admin” role on that dataverse (see Root Dataverse Collection Permissions). Admins of a Dataverse collection can assign roles and permissions to the users of that Dataverse collection. If you are an admin on a Dataverse collection, then you will find the link to the Permissions page under the Edit dropdown on the Dataverse collection page.
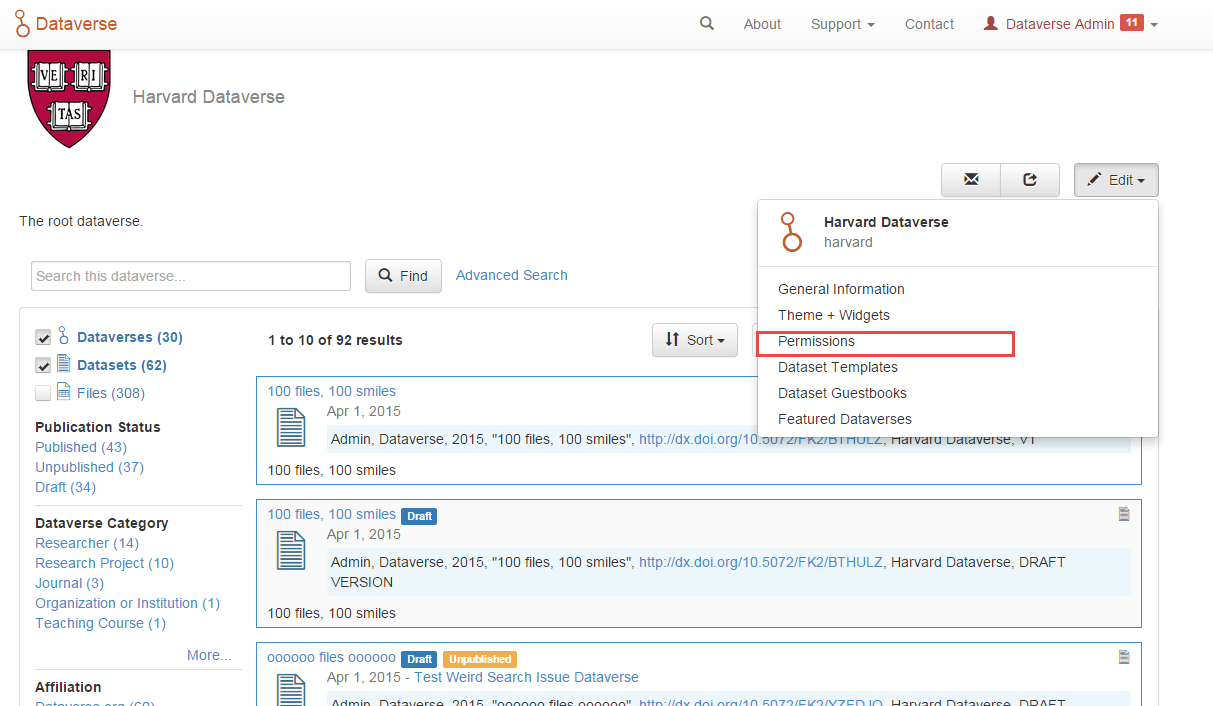
Clicking on Permissions will bring you to this page:
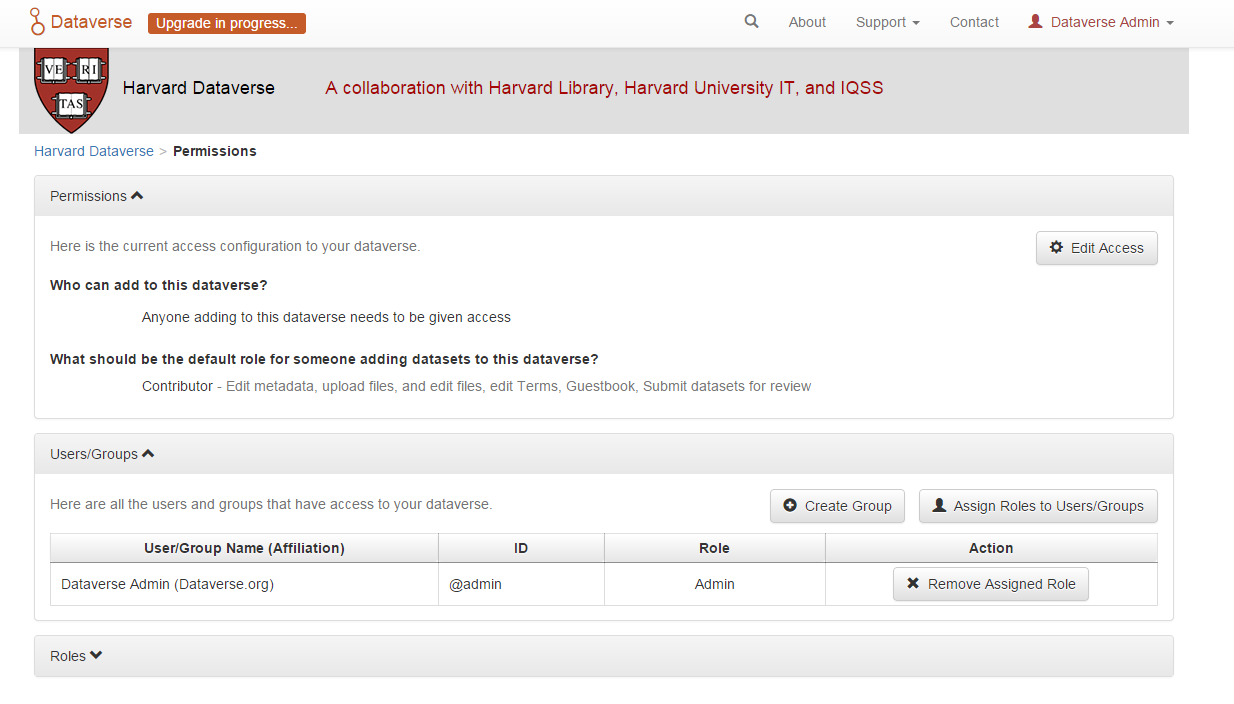
When you access a Dataverse collection’s permissions page, you will see three or four sections:
Permissions: Here you can decide the requirements that determine which types of users can add datasets and sub Dataverse collections to your Dataverse collection, and what permissions they’ll be granted when they do so.
Users/Groups: Here you can assign roles to specific users or groups, determining which actions they are permitted to take on your Dataverse collection. You can also reference a list of all users who have roles assigned to them for your Dataverse collection and remove their roles if you please.
Roles: Here you can reference a full list of roles that can be assigned to users of your Dataverse collection. Each role lists the permissions that it offers.
Role Assignment History If enabled, you’ll be able to see the history of when roles have been assigned and revoked and by whom.
Please note that even on a newly created Dataverse collection, you may see user and groups have already been granted role(s) if your installation has :InheritParentRoleAssignments set. For more on this setting, see the Configuration section of the Installation Guide.
Setting Access Configurations
Under the Permissions tab, you can click the “Edit Access” button to open a box where you can add to your Dataverse collection and what permissions are granted to those who add to your Dataverse collection.
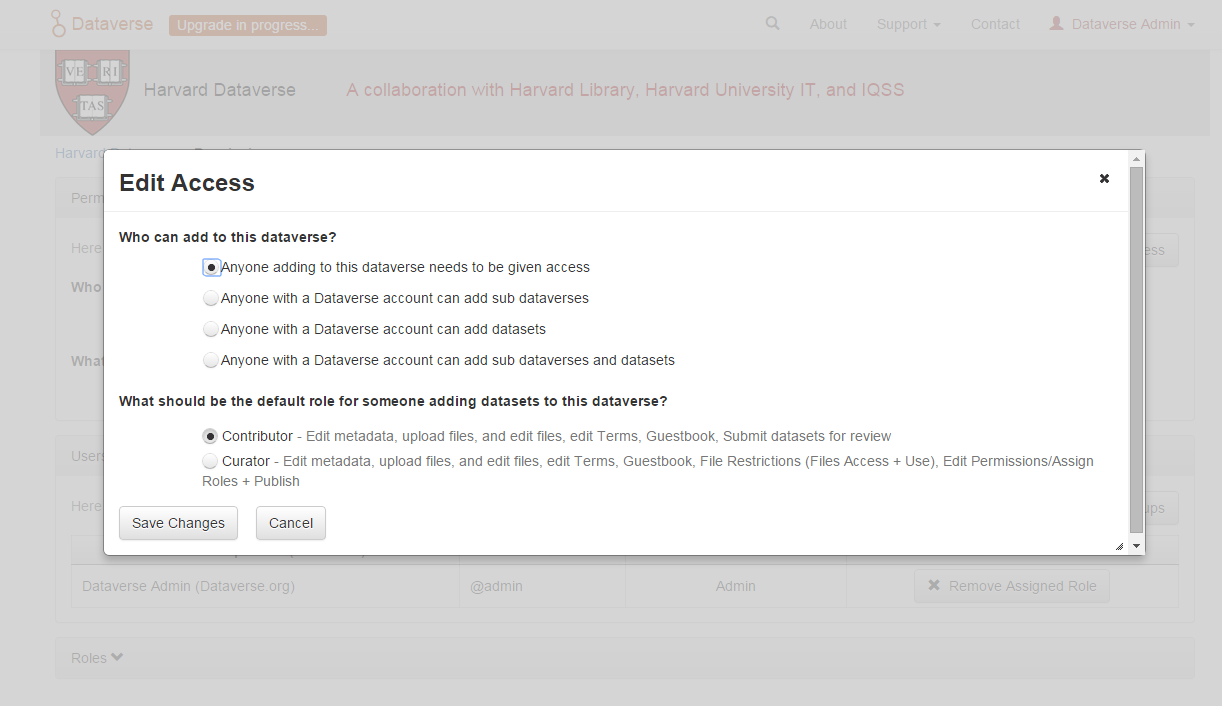
The first question on this page allows you to determine how open your Dataverse collection is to new additions - you can set whether or not the entire userbase (all logged in users) has the ability to add datasets or sub Dataverse collections to your Dataverse collection.
The second question on this page allows you to choose the role (and thus the permissions) granted to users who add a dataset to your Dataverse collection. The role you select will be automatically granted to any user who creates a dataset on your Dataverse collection, on that dataset, at the moment that they create it. The role the user is given determines their permissions for the dataset they’ve created. The key difference between the two roles is that curators can publish their own datasets, while contributors must submit the dataset to be reviewed before publication. Additionally, curators can manage dataset permissions. Note that this setting does not retroactively apply roles to users who have previously added datasets to your Dataverse collection; it only applies to users adding new datasets going forward.
Both of these settings can be changed at any time.
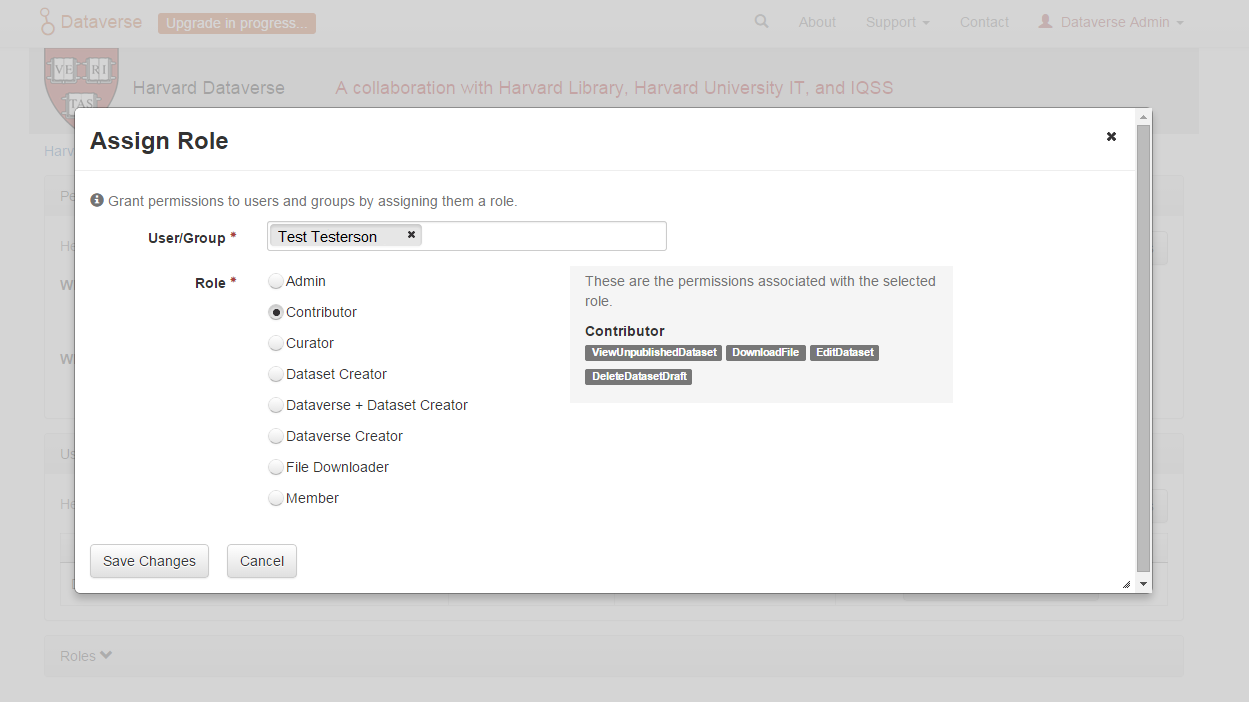
Assigning Roles to Users and Groups
Under the Users/Groups tab, you can add, edit, or remove the roles granted to users and groups on your Dataverse collection. A role is a set of permissions granted to a user or group when they’re using your Dataverse collection. For example, giving your research assistant the “Contributor” role would give them the following self-explanatory permissions on your Dataverse collection and all datasets within your Dataverse collection: “ViewUnpublishedDataset”, “DownloadFile”, “EditDataset”, and “DeleteDatasetDraft”. They would, however, lack the “PublishDataset” permission, and thus would be unable to publish datasets on your Dataverse collection. If you wanted to give them that permission, you would give them a role with that permission, like the Curator role. Users and groups can hold multiple roles at the same time if needed. Roles can be removed at any time. All roles and their associated permissions are listed under the “Roles” tab of the same page.

Note that the Dataset Creator role and Contributor role are sometimes confused. The Dataset Creator role is assigned at the Dataverse collection level and allows a user to create new datasets in that Dataverse collection. The Contributor role can be assigned at the dataset level, granting a user the ability to edit that specific dataset. Alternatively, the Contributor role can be assigned at the Dataverse collection level, granting the user the ability to edit all datasets in that Dataverse collection.
Note: If you need to assign a role to ALL user accounts in a Dataverse installation, you can assign the role to the “:authenticated-users” group.
Dataset Templates
Templates are useful when you want to provide custom instructions on how to fill out a field, have several datasets that have the same information in multiple metadata fields that you would prefer not to have to keep manually typing in, or if you want to use a custom set of Terms of Use and Access for multiple datasets in a Dataverse collection. In Dataverse Software 4.0+, templates are created at the Dataverse collection level, can be deleted (so it does not show for future datasets), set to default (not required), or can be copied so you do not have to start over when creating a new template with similar metadata from another template. When a template is deleted, it does not impact the datasets that have used the template already.
How do you create a template?
Navigate to your Dataverse collection, click on the Edit Dataverse button and select Dataset Templates.
Once you have clicked on Dataset Templates, you will be brought to the Dataset Templates page. On this page, you can 1) decide to use the dataset templates from your parent Dataverse collection 2) create a new dataset template or 3) do both.
Click on the Create Dataset Template to get started. You will see that the template is the same as the create dataset page with an additional field at the top of the page to add a name for the template.
To add custom instructions, click on ‘’(None - click to add)’’ and enter the instructions you wish users to see. If you wish to edit existing instructions, click on them to make the text editable.
After adding information into the metadata fields you have information for and clicking Save and Add Terms, you will be brought to the page where you can add custom Terms of Use and Access. If you do not need custom Terms of Use and Access, click the Save Dataset Template, and only the metadata fields will be saved.
After clicking Save Dataset Template, you will be brought back to the Manage Dataset Templates page and should see your template listed there now with the make default, edit, view, or delete options.
A Dataverse collection does not have to have a default template and users can select which template they would like to use while on the Create Dataset page.
You can also click on the View button on the Manage Dataset Templates page to see what metadata fields have information filled in.
* Please note that the ability to choose which metadata fields are hidden, required, or optional is done on the General Information page for the Dataverse collection.
Dataset Guestbooks
Guestbooks allow you to collect data about who is downloading the files from your datasets. You can decide to collect account information (username, given name & last name, affiliation, etc.) as well as create custom questions (e.g., What do you plan to use this data for?). You are also able to download the data collected from the enabled guestbooks as CSV files to store and use outside of the Dataverse installation.
How do you create a guestbook?
After creating a Dataverse collection, click on the “Edit Dataverse” button and select “Dataset Guestbooks”.
To create a new guestbook, click the “Create Dataset Guestbook” button on the right side of the page.
Name the guestbook, determine the account information that you would like to be required (all account information fields show when someone downloads a file), and then add custom questions (can be required or not required), if desired.
Click the “Create Dataset Guestbook” button once you have finished.
What can you do with a guestbook? After creating a guestbook, you will notice there are several options for a guestbook that appear in the list of guestbooks.
From the dataset page, you can select a guestbook by clicking “Terms” and then “Edit Terms Requirements”, unless the guestbook is disabled.
From the “Manage Dataset Guestbooks” page, there are options to view, copy, edit, disable, or delete a guestbook. There are also options to download or view responses. By default, guestbooks inherited from the parent Dataverse collection will appear. If you do not want to use or see those guestbooks, uncheck the checkbox that says “Include Guestbooks from [Parent]”.
Note that it is also possible to download guestbook responses via API. See Retrieve Guestbook Responses for a Dataverse Collection for details.
Featured Dataverse Collection
Featured Dataverse collections is a way to display sub Dataverse collections in your Dataverse collection that you want to feature for people to easily see when they visit your Dataverse collection.
Click on Featured Dataverse Collections and a pop up will appear. Select which Dataverse subcollections you would like to have appear.
Note: Featured Dataverse collections can only be used with published Dataverse collections.
Dataset Linking
Dataset linking allows a Dataverse collection owner to “link” their Dataverse collection to a dataset that exists outside of that Dataverse collection, so it appears in the Dataverse collection’s list of contents without actually being in that Dataverse collection. You can link other users’ datasets to your Dataverse collection, but that does not transfer editing or other special permissions to you. The linked dataset will still be under the original user’s control.
For example, researchers working on a collaborative study across institutions can each link their own individual institutional Dataverse collections to the one collaborative dataset, making it easier for interested parties from each institution to find the study.
In order to link a dataset, you will need your account to have the “Link Dataset” permission on the Dataverse collection that is doing the linking. If you created the Dataverse collection then you should have this permission already, but if not then you will need to ask the admin of that Dataverse collection to assign that permission to your account. You do not need any special permissions on the dataset being linked.
To link a dataset to your Dataverse collection, you must navigate to that dataset and click the white “Link” button in the upper-right corner of the dataset page. This will open up a window where you can type in the name of the Dataverse collection that you would like to link the dataset to. Select your Dataverse collection and click the save button. This will establish the link, and the dataset will now appear under your Dataverse collection.
A draft dataset can be linked to other Dataverse collections. It will only become publicly visible in the linked collection(s) after it has been published. To publish the dataset, your account must have the “Publish Dataset” permission for the Dataverse collection in which the dataset was originally created. Permissions in the linked Dataverse collections do not apply.
There is currently no way to remove established links in the UI. If you need to remove a link between a Dataverse collection and a dataset, please contact the support team for the Dataverse installation you are using (see the Unlink a Dataset section of the Admin Guide for more information).
Dataverse Collection Linking
Similarly to dataset linking, Dataverse collection linking allows a Dataverse collection owner to “link” their Dataverse collection to another Dataverse collection, so the Dataverse collection being linked will appear in the linking Dataverse collection’s list of contents without actually being in that Dataverse collection. Currently, the ability to link a Dataverse collection to another Dataverse collection is a superuser only feature.
If you need to have a Dataverse collection linked to your Dataverse collection, please contact the support team for the Dataverse installation you are using.
Publish Your Dataverse Collection
Once your Dataverse collection is ready to go public, go to your Dataverse collection page, click on the “Publish” button on the right hand side of the page. A pop-up will appear to confirm that you are ready to actually Publish, since once a Dataverse collection is made public, it can no longer be unpublished.
Locally FAIR
Locally FAIR describes content that is managed according to FAIR principles (Findable, Accessible, Interoperable, and Reusable) within a defined local or organizational community rather than for the public internet as a whole.
Dataverse now has optional, experimental support for managing Locally FAIR collections.
In a typical public Dataverse installation, published dataset metadata is visible to everyone, even if the dataset’s files themselves may be embargoed or restricted. Locally FAIR support extends this model by allowing some collections, and the published datasets within them to remain visible only to designated users or groups. This makes it possible for a single Dataverse installation to support both:
public, globally discoverable content; and
organizational content whose existence and metadata are only be visible to authorized users.
The rationale for making some content Locally FAIR can vary. Locally FAIR content can include:
sensitive research collections;
institution-only datasets;
datasets that should not be accessible to bots that may not adhere to the dataset license and terms, and
projects under contractual or policy restrictions;
Dataverse’s Locally FAIR mechanism is appropriate for repositories that will house at least some data whose metadata should only be visible to organizational members. The decision to make data Locally FAIR is managed at the collection level and repositories can have both FAIR and Locally FAIR content.
What Locally FAIR Means
Locally FAIR content is intended to be FAIR within a particular community.
That means:
Findable Data is easy to locate for both humans and machines, when authorized. Locally FAIR datasets (and files if configured) have persistent identifiers, but do not use DOIs which are publicly searchable.
Accessible Data is retrievable through standardized protocols. Authorized users can use Dataverse’s standard user interface and API calls to access Locally FAIR content in the same way they do with any published data.
Interoperable Data should be compatible with other datasets and systems. Locally FAIR datasets in Dataverse use the same standard metadata blocks as for public content and files undergo the same ingest process, use the same previewers and tools, etc.
Reusable Data should be well-described and licensed in a way that allows others to use it for future research. The licenses and terms on Locally FAIR content make it clear how and when the data can be re-used.
Why Repositories Use It
Without Locally FAIR support, repositories may need separate Dataverse installations to separate public and organization-only content.
How It Differs from Restricted Files
Restricting or embargoing files limits access to the file contents, but in a standard public repository the dataset’s published metadata, including the list of files, would still be visible. If a dataset allows requests for file access, anyone can request access, even if the dataset’s license or terms limit access to specific groups.
Locally FAIR goes further. Locally FAIR collections and datasets do not appear in content listings or search results for unauthorized users, nor can the collection/dataset/file page be viewed. API access is also blocked for unauthorized access.
Who Can See Locally FAIR Content
Visibility is determined by superusers and is managed at the collection level. Access can be granted to any groups or users defined in Dataverse - the same groups/users available when assigning roles on collections, datasets, and files.
How Can You Tell When Content is Locally FAIR?
The Dataverse UI adds a “Locally FAIR” tag to all collections, datasets, and files who’s visibility is limited by the locally FAIR mechanism.
Why is Locally FAIR Support “Experimental”
The word “experimental” is used when functionality is new, may evolve signifcantly in future releases, and generally may require more effort to configure and manage and/or more effort to support than more mature functionality.
With the current Locally FAIR implementation, managers need to be aware that they are responsible for choosing collection settings compatible with Locally FAIR content, i.e. not using DOIs (whose metadata is publicly accessible) or publicly visible stores, etc. Users and managers should also be aware that some functionality that might expose Locally FAIR content, e.g. linking, may not be prohibited programmatically but should still be avoided. Similarly, users should be aware that functionality such as metrics and quotas may expose the existence of Locally FAIR content. If your Dataverse instance supports Locally FAIR data, you are encouraged to be an active participant in reporting any issues and suggesting further improvements.
Things to Keep in Mind
If your repository supports Locally FAIR content:
published does not always mean public;
search and browse results may vary depending on who is logged in;
colleagues outside your authorized group may not be able to see the same datasets you can see;
you should not share Locally FAIR content with others who don’t have access themselves; and
this functionality is experimental.
Enabling Locally FAIR Support
See dataverse.feature.allow-locally-fair-data in the Installation Guide.
Managing Locally FAIR Via API
See List Locally FAIR Role Assignees for a Dataverse Collection and related API enpoints in the API Guide.